EZCloud Setup
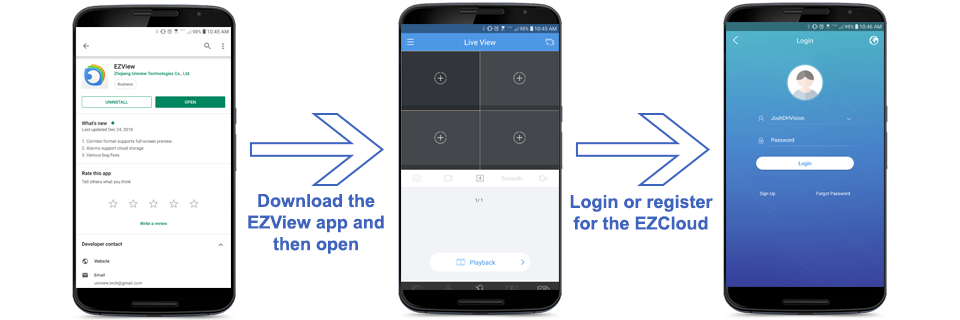
Downloading the app and choosing how to use the cloud |
|
 |
|
| 1. |
Decide on the main way you are going to use the EZCloud. There are two main ways: After making the decision on which way you wish to use the cloud each person viewing the system will need to download the Uniview app. |
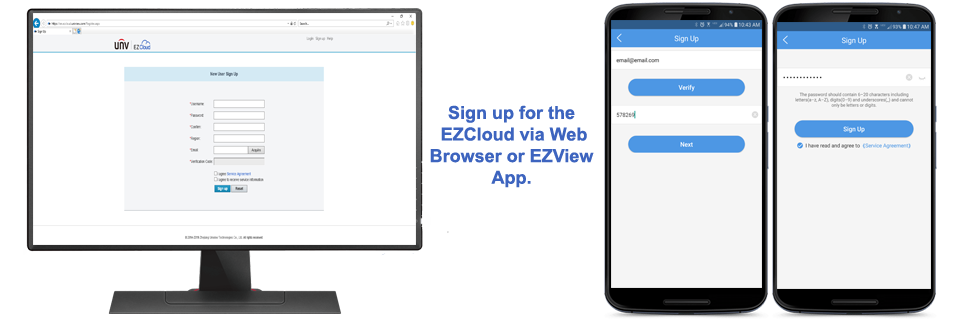
Registering a cloud account |
|
 |
|
| 2. |
Next the client will need to make a cloud account (The installer will need to make a cloud account as well if this is the first time using the cloud) There are two ways to make a cloud account: Note: When creating a cloud account the user will have to enter in an email address. Then click on acquire/verify to receive a verification code. The user will then need to place this verification code into the sign up form. This means that the user signing up will need access to their email. The verification codes are only valid for 30 minutes. |
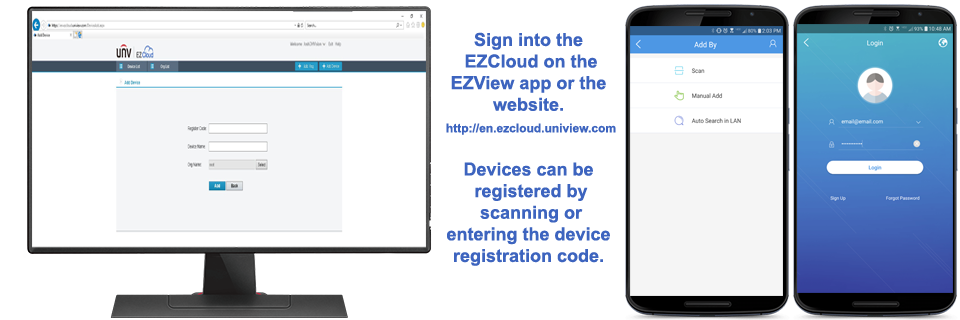
Logging in and registering a device to the cloud |
|
 |
|
| 3. |
After creating an EZCloud account the user will need to log in. In most cases the app and web browser will automatically log the user in after registering. If this does not happen you can log into the newly created account the following ways: Units can be registered directly online via the EZCloud website and they can also be registered via the phone apps. Note: Only one user can scan the QR Code all other users will use the same EZCloud account on their devices or they will make their own cloud account to use on their device and then the owner account will share the device to them. |
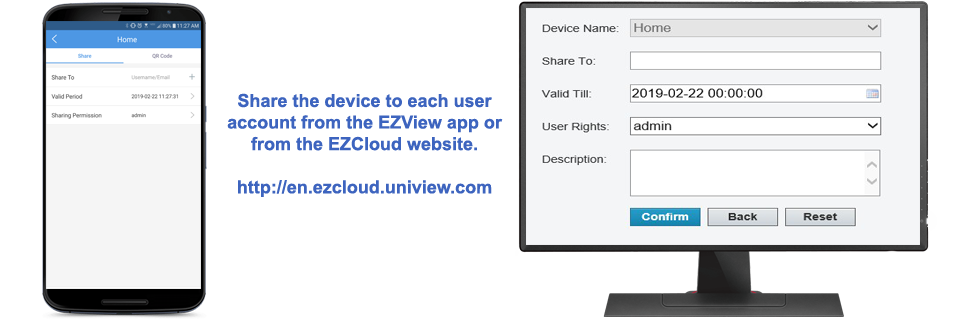
Sharing a cloud device |
|
 |
|
| 4. |
Sharing a device to different account can be done in multiple ways. There are two main ways to share the device and one less used way. The first main way to share a device is via the EZCloud website. Once a user is logged into their cloud account and the device is registered they can then click on the device "Share" button, this will then ask the sharing user to type in the second users e-mail address they registered to the cloud with or their cloud username. Then it will ask for a valid till period (we suggest at least 5 years for admin users). When the valid till date is reached the user that the device has been shared TO will then no longer have access. Next "User Rights" will set the rights to the user the device is being shared to. These user rights come directly from the recorders accounts, if you want to limit users the account will be set up directly on the recorder and they will then appear in the user rights list. Last "Description" can be any amount of information that the sharing user wants to note. The second main way is via the EZView app. In the EZView the user will open the main menu and navigate to the "Devices" menu. In devices the user will click on the device they wish to share and then in the pop up menu the user will click on the "Share" button. The app will then ask for the second cloud accounts email address or username, the valid till period and for the users rights. Once each field is selected or filled out click on "Share" at the bottom of the screen. The third way to share the device that is not used that often is via QR Code. In the EZView the user will open the main menu and navigate to the "Devices" menu. In devices the user will click on the device they wish to share and then in the pop up menu the user will click on the "Share" button. Next at the top of the sharing menu click on the QR code button. The app will then ask for a password, this password is any password that the user wants to create (the password does have to be 8 characters with one capital and one number or symbol.) This password is just to secure the QR code so that way it can only be scanned and used by the people that know the password. After setting up the password set a valid till date and then select the user rights and then select from one of the 3 options at the bottom. After the device is shared to a user the shared device will automatically pop up into their devices list. Sometimes the device list may need to be refreshed to display a newly shared device if the app was already open when the device was shared. To refresh the device list navigate to the main menu of the app and go to "Devices" and then press and hold anywhere on the blank part of the screen and then drag down, when prompted release to refresh let go of the screen. Where ever the user logs into their cloud account, whether they are the owners of the device or whether the device was shared to them, the device will be listed automatically for them they will never have to rescan the QR code or have the device re-shared to them for each new device they want to use. |
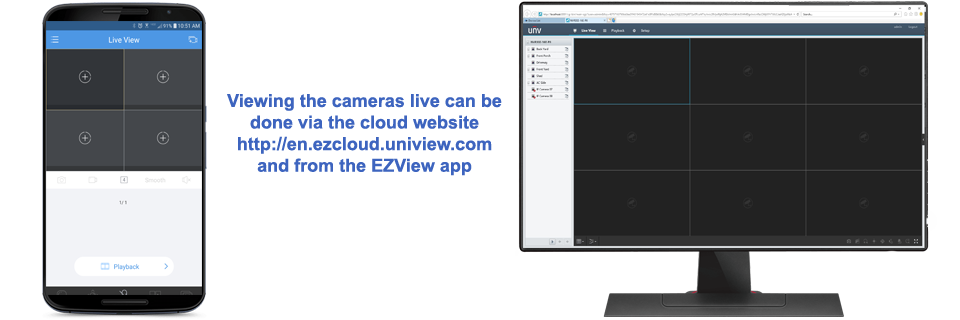
Starting Live View |
|
 |
|
| 5. |
Once everyone has access to the device they can start to live view and playback the cameras. Starting live view on the EZView app is done view the Live view option in the apps main menu. Once in the live view users can click the camera in the upper right hand corner of the screen. This will display the device list, in the list if the user clicks the device once it will lightly fill in the circle with a light blue shade. This indicates that it auto selected the channels that actually have a camera on them and none of the empty channels on the recorder. If the user clicks the device again the circle will fill it and have a check mark this indicates that it selected all channels including the empty ones. After the user has selected their cameras to view they click on "Start Live View" at the bottom. Accessing the device and displaying the cameras live view the web browser could require a couple changes to the computer. Sometimes the Internet Explorer may not load something correct or work correctly without some computer adjustments below are some of the main reasons the recorder may not work correcty: |